Showing posts with label veggies. Show all posts

Saturday, September 28, 2013

a classic OR spiced zucchini bread

I think quick breads are the Little Women of baking. 
They are just classics.
Banana bread and applesauce bread are two of our favorites.  And this time of year, we slip into this delicious fall Spiced Zucchini Bread.  I love the smell of the cinnamon, cloves and allspice warming my kitchen as this bread bakes.  The flecks of green look lovely in this sweet bread.  Bonus:  it freezes beautifully. 


I let it cool completely then wrap it in plastic and then foil.  Don't forget to label!  There is nothing better than pulling out a loaf of this yummage bread in mid-February and enjoying it warm, slathered in butter.  Make a few extra loaves this fall!


Spiced Zucchini Bread
from Bryttin
makes 2 loaves

3 cups shredded zucchini
1 2/3 cups sugar
2/3 cup vegetable oil
2 tsp. vanilla
4 large eggs
3 1/2 cups flour
2 tsp. baking soda
1/2 tsp baking powder
1 tsp. salt
1 Tb. cinnamon
1 tsp. cloves
1 tsp. allspice
1 tsp. nutmeg
1/2 cup chopped nuts (optional)

- Heat oven to 350.  Grease the bottom of two loaf pans.
- Mix zucchini, sugar, oil, vanilla and eggs in a large bowl until smooth.  Stir in remaining ingredients.  Add nuts, if using.
- Divide batter into pans and bake for 50-60 minutes or until a toothpick comes out clean.  Cool 10 minutes on a wire rack.
- Loosen sides and turn out loaves to cool completely before freezing.  Otherwise, slice and eat warm!

Wednesday, September 25, 2013

chocolate cake for breakfast! OR the best chocolate zucchini bread

Growing up, my siblings and I loved listening to Bill Cosby's standup routines on tape. 
One of our favorite bits he did was the "dad lets us eat chocolate cake for breakfast".  He tells how his kids begged for chocolate cake for breakfast.  As he thought through the ingredient list: 
Milk!  Health food!
Flour!  Health food!
Eggs!  Healthy!
So he sliced off a piece for each of his kids and watched their happy faces as they ate chocolate cake for breakfast.  "Dad is great....gives us the chocolate cake" the kids sang. 


This is that cake. 
I like to call it "bread" so we can eat it just about anytime!
It's moist, chocolatey and super yummage. 
And healthy!  That's right. 
Just look at the ingredient list: 
Flour!  Healthy!
Eggs!  Health food!
Zucchini!  Vegetable!

We eat this warm for breakfast and also for dessert with a dollop of whipped cream.

Chocolate Zucchini Bread {makes 2 loaves}
Recipe by Our Best Bites

2 C flour
2 t cinnamon
1/2 t salt
1 1/2 t baking soda
6 T unsweetened cocoa powder
1/2 C canola oil
1 C sugar
1/4 C brown sugar
3 eggs
2 t vanilla
1/2 C sour cream
3 C grated zucchini
3/4 C mini chocolate chips
optional: zest from one orange
Topping:
2 T brown sugar
2 T white sugar
1/2 t cinnamon
Preheat oven to 350 degrees. Butter and flour 2 loaf pans and set aside. Mix topping ingredients in a small bowl and set aside.
Place flour, cinnamon, baking soda, salt, and cocoa powder in a small bowl and whisk to combine. Set aside.With a stand or hand mixer beat oil, white sugar, brown sugar, and eggs until combined and slightly fluffy, 1-2 minutes.
Add vanilla and sour cream and mix until combined.
Gently stir in the grated zucchini (and zest if you’re using).Take a spoonful of the flour mixture and stir in with the chocolate chips (that will help keep them evenly distributed.)Add the remaining flour mixture to the batter and stir just until combined. Add chocolate chips and stir to combine.
Divide the batter between the two pans. and sprinkle topping over each. Place pans on a cookie sheet for easy moving.  Bake in your preheated 350 degree oven for 50-60 minutes. I set my timer for 45 minutes and then keep an eye on it for the remainder. Ya never know how different ovens handle things.
When it’s done a toothpick or skewer should come out without goopy batter on it and the top will be gorgeous and cracked with sugar.  Let it cool on a rack for 5-10 minutes and then remove from pans.

Sunday, September 22, 2013

storing up for the winter OR zucchini bread

It seems to happen every year. 


That big green veggie comes into my kitchen by the armful.  Friendly neighbors sharing their garden's bounty with me.  I love squash, especially zucchini.  But September seems to overload my system.  That's why shredding it up and making a few breads to stick in the freezer always seems to happen at the time of year, too.  I'll be sharing a few of my favorite zucchini bread recipes over the next few days.

My preschooler helped me shred big green chunks of squash on the box grater as we listened to music and danced in the kitchen.  She's getting so big.  I sometimes wish I could just freeze her at this age right along with my zucchini bread!  We made a double batch of everything and still had squash leftover.  Looks like another baking/dancing day is in order at my house. 

I found this delicious cornbread on Pinterest and have ended up loving this blog, Mostly Foodstuffs.  She has lots of yummage recipes- check it out!


Brown Butter Zucchini Cornbread

from Bon Appetit, via Epicurious
yields 1 loaf


1 good-sized zucchini (about 12 ounces)
1 cup flour
1/2 cup whole wheat pastry flour (or just use additional flour)
1 teaspoon baking powder
1 teaspoon baking soda
1 teaspoon coarse salt
3/4 cup medium-grind cornmeal (standard cornmeal would work fine)
1/2 cup (1 stick) unsalted butter, plus additional for greasing pan
1/2 cup buttermilk
2 large eggs
1/3 cup sugar, plus additional coarse sugar for sanding the top

Preheat your to 350° Fahrenheit. Butter and flour a loaf pan, and set aside.
Trim the ends off the zucchini, and slice a half-dozen whisper-thin slices off to reserve as garnish. Grate the remaining zucchini on the coarse holes of a grater, then set aside in a colander to drain while you prepare the rest of the recipe.
In a large bowl, sift together the flours, baking powder, baking soda, salt and cornmeal. Set aside.
Melt the butter in a small saucepan over medium-high heat. Continue cooking until butter solids at bottom of pan turn golden brown, about 3 minutes, then pour out into a medium bowl. Let cool slightly, then pour in the buttermilk, whisking to help cool the butter and take the chill off the buttermilk. Add the eggs and sugar, and whisk well to combine. Give the zucchini a quick press in the colander to release any liquid, and stir into the bowl as well.
Gently fold the dry mixture into the zucchini mixture, stirring until *just* combined (the mixture will be quite thick). Pour into your prepared pan, and smooth the top. Gently lay the reserved zucchini slices in a row down the top, then sprinkle generously with coarse sugar. Bake until golden and a tester comes out clean, ~45 minutes to an hour. Let cool in pan for 15 minutes, then turn out onto a rack and cool fully before slicing.

Sunday, June 30, 2013

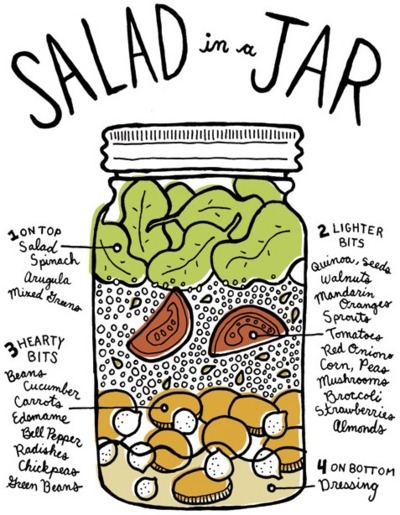
summertime OR salad in a jar

Hello again.  It's been a while.

It's that time of year.  The sun is out.  The kids are swimming in the back yard every day.  Sprinklers are sprinkling the grass.  Popsicles are dripping down our arms.  Vacations to the forest seem to happen more often.  Ahh, summertime.  I love this time of year.

In the summer, meals take on a lazy-dazy feel.  We grill.  We skewer lots of things.  We make smoothies.  We seem to wrap everything in a tortilla.  And we eat salad.  Delicious salads of all sorts make their appearance on our table.  In my CSA basket, we've been getting fresh greens every week.  We've also tried out a few new foods:  garlic scapes, radish pods, breakfast radishes.  But our favorite discovery are microgreens.  These flavorful little greens spice up our salads and both my husband and I miss a salad without them now!  Keep your eyes out at the supermarket or farmer's market for those little green bites...you'll never go back! 

And to use up all these delicious new flavors- salad in a jar.  I make several of these beauties on Monday and they last us for lunches for about 4 days or so.  In a pinch, I've even emptied the prepared ingredients into a bowl for dinner, too!  I love seeing my mason jars lined up in the fridge with all my goodies from my CSA share just waiting to be savored.


Monday, April 8, 2013

spicy diet OR asian beef lettuce wraps

I've been doing this wild diet.

Lots of fresh veggies and fruit- which I usually love.  But I can only handle salads for lunch every day for a limited amount of time before I get bored.  I am used to making the grain the star of the show at dinner- but since I'm abstaining for a season- it's hard for me to make veggies full of that same flavor.  Truthfully, speed and ease is also an issue.  I like to be able to make dinner in about 30-45 minutes...sometimes to really inject some oomph into veg it takes a bit longer.  The food I've been making is yummy, but has not had as much flavor as I am wishing for. 
I've added fresh herbs. 
Lots of citrus. 
Tried eating raw.  Or with a reduced sauce.
But nothing seems to quench that burst of flavor I've been wanting. 

Then I found this recipe and decided to try it for dinner one night.  The heat, the spice, the crunch.  Everything came together perfectly.  Kismet.  My tastebuds were screaming for more!  I made another batch and secreted it into the back of the fridge to save exclusively for my lunches for the next few days.  Selfish?  Maybe- but also necessary. 

This wonderful recipe taught me the value of chili garlic paste and how a little spice can actually make "diet food" super delicious.

ASIAN BEEF LETTUCE WRAPS
from The Comfort of Cooking

Yield: Serves 4 (3 wraps each)

Ingredients:

12 leaves lettuce (iceberg, romaine, Boston or green leaf)
1 tablespoon vegetable oil
1 red bell pepper, seeded and diced
1 yellow onion, diced
1 lb. ground beef
1/4 tsp. each salt and pepper
2 garlic cloves, minced
1 tablespoon soy sauce
1/4 cup hoisin sauce
1-2 Tbsp. chili sauce *
1 teaspoon ground ginger
1 tablespoon rice wine vinegar
4 green onions, chopped

Directions:

Gently rinse lettuce leaves and pat dry, careful not to tear them. Set aside.
In a large nonstick skillet, heat oil over high heat. Add bell pepper and onion, cook 3 minutes. Add ground beef and cook 5 minutes, breaking up with a wooden spoon. Drain grease and return pan to stovetop; reduce heat to medium. Season with salt and pepper. Stir in garlic, soy sauce, hoisin and chili sauces, ginger, rice vinegar and honey. Cook until sauce has thickened, 3-4 minutes. Stir in green onions.
Spoon meat mixture into a medium bowl and place on a large serving platter. Arrange lettuce leaves around the bowl and serve.
Enjoy!
* This is a thick red paste with medium-high spice, made from red chilies, vinegar and salt. It can be found in the Asian or ethnic sections of most grocery stores.  One tablespoon was about my heat limit!

Tuesday, February 12, 2013

no guilt OR veggie chop n' prep

I haven't always been a meal planner.  I used to just buy what I thought were "basics" and then make our meals on a whim at 5pm.  I would experiment with new flavors and foods.  Sometimes I would run to the grocery store mid-dinner preparations for an ingredient we didn't have on hand.  Sometimes I hadn't really planned on the baking time- so we would sit down to a late dinner at 8pm and toast the spontaneity of the chef and tender, delicous food.

Then we had our first daughter. 
After the first few weeks of survival mode, I realized my off the cuff cooking wasn't cutting it anymore.  The meal plan was born.  After a little trial and error- I found a way of planning that fit our family and my style.  I changed my habits and haven't looked back!  I still try new foods, flavors and recipes- but now I always have the ingredients ready to go and baking time always figures in to our 6pm dinner time. 
My veggie tray. This one has a lid and keeps well in my fridge.  You can see I'm slicing up some onion for a stir fry mix I'm bagging for later in the week.  Actually, I made two of those stir fry mix bags and put one in the freezer for later this month!

One thing that saves me every week it washing, chopping and prepping all of my fruit and vegetables on one day.  I get 85% of my produce in a co-op basket.  Mondays I plan my meals around what I got in my Saturday basket.  If needed, I supplement at the store or Costco- usually on Mondays.  I chop all my veggies so they are ready to go for the week.  I always chop up a veggie tray to keep in the fridge.  Then at lunch time or dinner time I can bring out a ready to go tray and have no guilt about what we are eating.  This is also great for snacktime.  And my girls will eat pretty much any vegetable as long as there is dip! 

BEST RANCH DIP
a favorite from allrecipes.com

1 cup mayo
1/2 cup sour cream (can use buttermilk instead)
1/2 tsp dried chives (I've used fresh herbs, too.  Just use a little more.)
1/2 tsp dried parsley
1/2 tsp dried dill
1/4 tsp garlic powder
1/4 tsp onion powder
1/4 tsp ground black pepper

Mix all ingredients well.  Cover and chill for at least 30 minutes before serving.