Tuesday, July 9, 2013

only in Montana OR fresh pasta

There are a few special dishes that families only make once a year.  Sometimes they are so time intensive that it may be impractical to make the dish more often.  Some things are associated with specific holidays or celebrations.  Some dishes may just seem out of place if they are made anywhere else or at any other time.

Fresh pasta is that way for me.

Rolling out pasta dough on the oversized well-worn bread board at our cabin in Montana is how you make pasta.  Grammy and I mix the eggs and flour in the butter-yellow pyrex bowl that has been there since the fifties.  Then we dump the floury, shaggy dough onto the board and knead it until it is smooth and elastic. We laugh and talk and take turns with the rolling pin when our arms give out.   After slicing the pasta thin with a pizza cutter, we let it dry out on the board.  Usually, our noodles get tossed into a massive pot of turkey noodle soup. 


Oh, I've made pasta plenty of times at home.   My husband loves it!  My kids like helping me mix the dough.  I have a nifty pasta roller that clicks on the counter and my girls help me churn.  I have tried several different recipes and we even make filled pasta sometimes. 

But to me, the real way to make pasta is in Montana on my great-grandma's bread board.


Fresh Pasta
by Mario Batali

3 1/2 cups all purpose flour
4 eggs

Mound the flour in the center of a large wooden cutting board. Make a well in the middle of the flour, add the eggs. Using a fork, beat together the eggs and begin to incorporate the flour starting with the inner rim of the well. As you incorporate the eggs, keep pushing the flour up to retain the well shape (do not worry if it looks messy). The dough will come together in a shaggy mass when about half of the flour is incorporated.

Start kneading the dough with both hands, primarily using the palms of your hands. Add more flour, in 1/2-cup increments, if the dough is too sticky. Once the dough is a cohesive mass, remove the dough from the board and scrape up any left over dry bits. Lightly flour the board and continue kneading for 3 more minutes. The dough should be elastic and a little sticky. Continue to knead for another 3 minutes, remembering to dust your board with flour when necessary. Wrap the dough in plastic wrap and set aside for 20 minutes at room temperature. Roll and form as desired.

Note: Do not skip the kneading or resting portion of this recipe, they are essential for a light pasta.


Friday, July 5, 2013

snack happy OR the best graham crackers

It's no secret that my kiddos are pretty great eaters.  I am always pleased when they both try sushi or ask for more cauliflower.  They adore artichokes and love lettuce.  One of their favorite meals is our grilled skirt steak!  I know I'm lucky to have such wonderful eaters.  There is only one drawback.  They seem to be constantly hungry.

 Maybe not constantly, but every few hours they want to eat again!
 
I've made a little snack box in the fridge I keep stocked with small jars of yogurt, string cheese, cucumbers and dip, sliced apples and bags of grapes.  I have a basket in the pantry with applesauce cups, bags of crackers, jars of dried fruit and jerky.  There is even a spot in the freezer with a few frozen goodies just for them!  But the one snack that really makes the girls happy? 

Good old fashioned graham crackers. 
They like to spread peanut butter or Nutella on them. 
Eat them with apple slices. 
S'mores don't seem complete without them. 
And since they are so simple, and delicious, I don't mind making a few batches at a time.  I hope your little snackers love these as much as mine.


The Best Homemade Graham Crackers
from The Homemade Pantry, by Alana Chernila

Makes 45 to 50 2 x 3-inch crackers

1 cup all-purpose flour
¾ cup whole wheat flour
½ cup rye flour, plus additional for the counter  (I use oat flour)
½  teaspoon salt
¼  teaspoon baking soda
½  teaspoon baking powder
1 ½ teaspoons ground cinnamon
¼ cup packed dark brown sugar
3 tablespoons cold unsalted butter, cut into 1-inch cubes
4 tablespoons shortening, cut into 1-inch cubes
4 tablespoons honey
2 teaspoons vanilla extract
1 teaspoon granulated sugar

1. In the bowl of a stand mixer, combine the flours with the salt, baking soda, baking powder, 1 teaspoon of the cinnamon, and the brown sugar. Mix for 10 seconds using the paddle attachment, then add the butter and shortening. Mix on medium speed for 30 seconds.

2. Combine the honey and vanilla with ¼ cup cold water in a liquid measuring cup and stir to combine until the honey is mostly dissolved. With the mixer running on medium- low speed, slowly pour the honey mixture into the bowl, giving the mixture time to absorb the liquid. Continue to mix for another 20 seconds, or until the dough comes together. It will still be slightly crumbly. Push the dough into a ball, wrap it in waxed paper, and refrigerate for at least 2 hours, and up to 3 days. (The dough can be wrapped and frozen at this point.)

3. Take the dough out of the refrigerator about 20 minutes before you are ready to bake. Preheat the oven to 350°F. Cut the dough in half, and lay one half between two sheets of waxed paper dusted with rye flour. Roll the dough as thin as you can get it, ideally 1⁄8 inch. It will still be slightly crumbly, but just press it back together and keep rolling. Use your pizza wheel, crinkle cutter, or knife to cut 2 × 3-inch rectangles. Use a spatula to separate the rectangles from the waxed paper and set them on an ungreased baking sheet. The crackers won’t spread, so they can be quite close. Reroll any scraps and repeat—then repeat again with the second half of the dough.

4.  In the small bowl, combine the remaining ½ teaspoon cinnamon with the granulated sugar. Sprinkle the crackers with the cinnamon mixture and prick the dough several times with a fork. Bake for 15 minutes, or until just starting to brown at the edges. Cool on a wire rack. The crackers are great out of the oven, but their flavor and texture improves the next day.

Store at room temperature in a covered container for up to 10 days. You can keep unbaked dough wrapped in wax paper in the fridge for three days before baking. In the freezer, dough can be wrapped in plastic and placed in a freezer bag for four months; or, freeze baked crackers for four months in a freezer bag.

Tuesday, July 2, 2013

the drip catcher idea OR popsicles

My girls love popsicles.  Any flavor, any shape. 

Our freezer is on the bottom, so from a young age- the girls have been able to open the frosty door and check out all the goodness inside.  I have a shelf devoted to all their chilly treats right inside the door.  A few favorites include frozen grapes, little dollops of yogurt and homemade popsicles.  They sit out on our back deck under the umbrella with red or purple sticky streaks running down their arms.  Then they "wash" in the kiddie pool on the lawn and really soak in what it means to be a kid in the summertime. 


After several stained favorite shirts, they asked for a "drip catcher" solution.  Mine?  Buy pink, yes- they must be pink, paper muffin cups.  Cut a small slit in the bottom.  Slide the popsicle stick in and enjoy a dripless treat!

Oh yes, I occasionally buy the fancy kind of pops from the store.  The one's with shapes or lots of colors, but the girls get such a kick out of helping me make popsicles- I stock up on molds and we let our imaginations run wild!  Here are two of our favorites.

Nutella Fudgesicles

1 1/2 cups chocolate milk
1/2 cup Nutella

1.  Whisk ingredients thoroughly- I use my blender.  Chill for one hour.
2.  Pour  chocolate goodness into popsicle molds, leaving a slight headspace for freezing.  Freeze until solid. 


Mango-Peach Yogurt Pops

2 ripe mangos, chopped
2 ripe peaches, peeled and chopped  (I use my bottled peaches)
1 1/2 cups plain yogurt  (We like greek)
1/2 cup milk

1.  Blend ingredients until smooth in the blender.
2.  Pour into popsicle molds and freeze until solid.  

Sunday, June 30, 2013

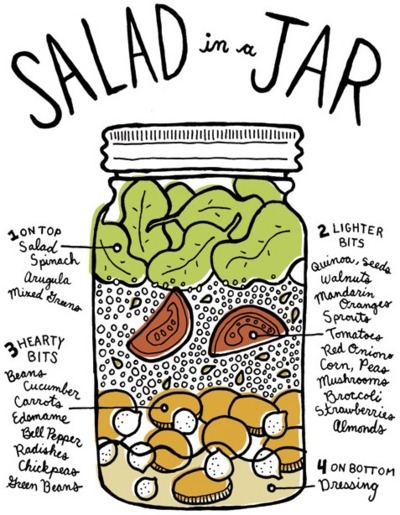
summertime OR salad in a jar

Hello again.  It's been a while.

It's that time of year.  The sun is out.  The kids are swimming in the back yard every day.  Sprinklers are sprinkling the grass.  Popsicles are dripping down our arms.  Vacations to the forest seem to happen more often.  Ahh, summertime.  I love this time of year.

In the summer, meals take on a lazy-dazy feel.  We grill.  We skewer lots of things.  We make smoothies.  We seem to wrap everything in a tortilla.  And we eat salad.  Delicious salads of all sorts make their appearance on our table.  In my CSA basket, we've been getting fresh greens every week.  We've also tried out a few new foods:  garlic scapes, radish pods, breakfast radishes.  But our favorite discovery are microgreens.  These flavorful little greens spice up our salads and both my husband and I miss a salad without them now!  Keep your eyes out at the supermarket or farmer's market for those little green bites...you'll never go back! 

And to use up all these delicious new flavors- salad in a jar.  I make several of these beauties on Monday and they last us for lunches for about 4 days or so.  In a pinch, I've even emptied the prepared ingredients into a bowl for dinner, too!  I love seeing my mason jars lined up in the fridge with all my goodies from my CSA share just waiting to be savored.


Thursday, May 2, 2013

my staple breakfast OR mango coconut smoothie

I had never had coconut milk until about 4 months ago.  I sort of pigeonholed it as some odd boxed drink for those cursed with lactose intolerance.  Oh yes, I made coconut rice or coconut cake occasionally. But it was always just an ingredient.

Now- I drink it every day!

The past few months have been chock full of changes in our family's diet.  Lucky for us, coconut milk is now a part of our mornings.  Smoothies have always been a favorite around here. We love the sweet pineapple in this one. Some mornings, if I am feeling extra healthy, I make it "green" with a few handfuls of spinach. Enjoy!

Mango Coconut Smoothie
serves 1-2, depending on thirst :)

1/2 cup frozen or fresh mango
1/4 cup frozen pineapple
coconut milk- some. Maybe 1/2 cup or so-ish.

Combine the fruit in the blender, add two splashes of milk. Blend on high, streaming in coconut milk until well blended and at the desired consistency. (We like ours thick, like a milkshake.)

Monday, April 8, 2013

spicy diet OR asian beef lettuce wraps

I've been doing this wild diet.

Lots of fresh veggies and fruit- which I usually love.  But I can only handle salads for lunch every day for a limited amount of time before I get bored.  I am used to making the grain the star of the show at dinner- but since I'm abstaining for a season- it's hard for me to make veggies full of that same flavor.  Truthfully, speed and ease is also an issue.  I like to be able to make dinner in about 30-45 minutes...sometimes to really inject some oomph into veg it takes a bit longer.  The food I've been making is yummy, but has not had as much flavor as I am wishing for. 
I've added fresh herbs. 
Lots of citrus. 
Tried eating raw.  Or with a reduced sauce.
But nothing seems to quench that burst of flavor I've been wanting. 

Then I found this recipe and decided to try it for dinner one night.  The heat, the spice, the crunch.  Everything came together perfectly.  Kismet.  My tastebuds were screaming for more!  I made another batch and secreted it into the back of the fridge to save exclusively for my lunches for the next few days.  Selfish?  Maybe- but also necessary. 

This wonderful recipe taught me the value of chili garlic paste and how a little spice can actually make "diet food" super delicious.

ASIAN BEEF LETTUCE WRAPS
from The Comfort of Cooking

Yield: Serves 4 (3 wraps each)

Ingredients:

12 leaves lettuce (iceberg, romaine, Boston or green leaf)
1 tablespoon vegetable oil
1 red bell pepper, seeded and diced
1 yellow onion, diced
1 lb. ground beef
1/4 tsp. each salt and pepper
2 garlic cloves, minced
1 tablespoon soy sauce
1/4 cup hoisin sauce
1-2 Tbsp. chili sauce *
1 teaspoon ground ginger
1 tablespoon rice wine vinegar
4 green onions, chopped

Directions:

Gently rinse lettuce leaves and pat dry, careful not to tear them. Set aside.
In a large nonstick skillet, heat oil over high heat. Add bell pepper and onion, cook 3 minutes. Add ground beef and cook 5 minutes, breaking up with a wooden spoon. Drain grease and return pan to stovetop; reduce heat to medium. Season with salt and pepper. Stir in garlic, soy sauce, hoisin and chili sauces, ginger, rice vinegar and honey. Cook until sauce has thickened, 3-4 minutes. Stir in green onions.
Spoon meat mixture into a medium bowl and place on a large serving platter. Arrange lettuce leaves around the bowl and serve.
Enjoy!
* This is a thick red paste with medium-high spice, made from red chilies, vinegar and salt. It can be found in the Asian or ethnic sections of most grocery stores.  One tablespoon was about my heat limit!

Thursday, March 21, 2013

Lyv's favorite OR the Best Burger Buns

My daughter Lyv adores hamburgers. 
She loves a heathly dose of mustard atop her bun, covered with a juicy burger, lettuce, tomatoes, a slice of real cheese and a big slice of pickle.  What can I say- mom and dad have taught her well. She'll order a hamburger just about anywhere we go.  And during the summer, it's our most requested dinner.  Oh, sometimes we'll change up the toppings and add garlic, carmelized onions or bbq sauce.  But a big, classic burger is everyone's favorite.

Nothing is worse than a flimsy bun that falls apart when you take the first bite of that juicy burger.  No!  We want something substantial that will hold up and even, gasp, impart some flavor to the party!  These are my favorite buns.  They are a snap to put together, very flavorful and even freeze well.  I make these into hot dog buns as well.

Best Burger Buns
from King Arthur Flour


  • 3/4 to 1 cup lukewarm water
  • 2 tablespoons butter
  • 1 large egg
  • 3 1/2 cups flour
  • 1/4 cup sugar
  • 1 1/4 teaspoons salt
  • 1 tablespoon instant yeast
  • *For best results (a smooth, slightly soft dough), use the smaller amount of water in summer (or in a humid environment), the greater amount in winter (or in a dry climate); and something in between the rest of the time.
  • 3 tablespoons melted butter

Directions

1) Mix and knead all of the dough ingredients — by hand, mixer, or bread machine — to make a soft, smooth dough.
2) Cover the dough, and let it rise for 1 to 2 hours, or until it's nearly doubled in bulk.
3) Gently deflate the dough, and divide it into 8-10 pieces. Shape each piece into a round ball; flatten to about 3" across. Place the buns on a lightly greased or parchment-lined baking sheet, cover, and let rise for about an hour, until noticeably puffy.
4) Brush the buns with about half of the melted butter.
5) Bake the buns in a preheated 375°F oven for 15 to 18 minutes, until golden. Remove them from the oven, and brush with the remaining melted butter. This will give the buns a satiny, buttery crust.
6) Cool the buns on a rack.